Engage for Salesforce
Overview: What is Engage for Salesforce?
Engage for Salesforce is a Salesforce application (available from the AppExchange) integrating the leading advocacy and grassroots technology, Engage, with Salesforce, the leader in CRM. Leverage your Engage and Salesforce data using Engage for Salesforce to:
- Eliminate double entry and manual imports
- Eliminate complicated record matching in Excel or with other tools
- Centralize your view of your advocacy campaign
- Add value to your advocacy data by integrating with Salesforce
- New user interface powered by Salesforce Lightning (Please Note: images in this document depict the Salesforce Lightning experience. Page display may be different on Salesforce Classic but the fields will remain the same.)
Once installed, Engage for Salesforce will synchronize user data, elected officials data, and activity data from the date of activation forward. Any new activity on your Engage site, or updates made to your Salesforce records, will be appropriately synchronized following activation.
Administration: Who Should Setup Your App
CQ Roll Call recommends a Salesforce Administrator or Business Systems Analyst follow the below documentation to provision and install Engage for Salesforce. If you require service support to provision and install the application, CQ Roll Call will refer you to a trusted service provider. Please contact us for additional information. engageforsalesforce@cqrollcall.com /202-650-6443
Provisioning and Installing: Overview of Process
- Prepare Your Engage Site and Connect Application
- Install the Engage for Salesforce Base Application for Contacts and Elected Officials
- Install the Engage for Salesforce Extension Application for Campaigns
- Configure Your Credentials for the Base Application
- Configure Your Credentials for the Extension Application
- Test Your Connection
- Configure Your Sync Preferences
- Sync Elected Officials and Activity: Update Your Salesforce Contact Page Layout
- Activity Rollup Summaries: Update Your Salesforce Campaign Page Layout
- Test Your Sync
- Appendix
Note: Engage for Salesforce makes updates to your Salesforce instance. Updates that occur after October, 29 2015 will only impact clients on base package 1.27.5 or a later version. If there any validation rules, triggers (either set up by your administrators or by any third party applications) etc. that check or verify contact/activity/campaign creation (i.e. address, zip-code, email, other field formats shared between the two systems or other requirements) they may cause conflicts with the Engage for Salesforce plug-in. These conflicts can cause the sync to fail. View best practices for a successful sync here.
Prepare Your Engage Site and Connect Application
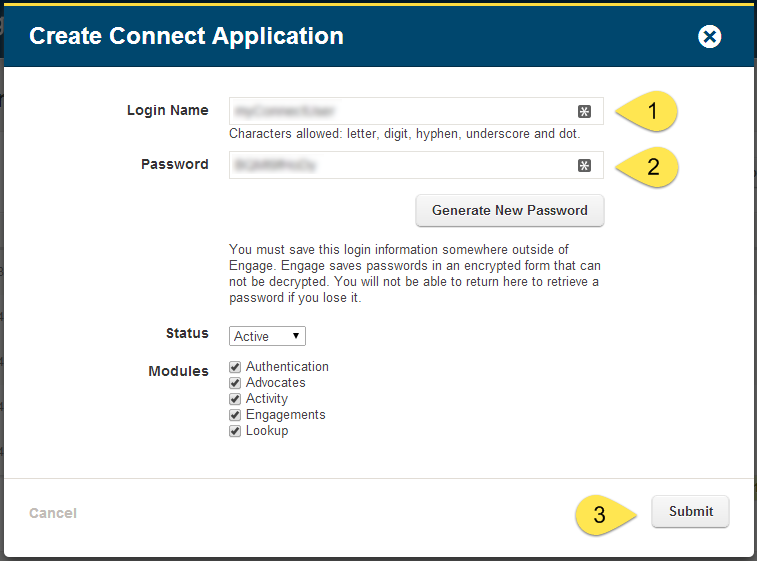
Your Engage Account Executive should provide you with login information for your Engage site, as well as an initial username and password for the Connect Application.
Note: The Connect Application credentials are different that your Engage login credentials.
If you need to create an alternate username and password, you can do from your Engage site via “Connect Applications” (under the Sites drop down).
To begin the process, access Engage Admin > Account > Connect Applications > Enter Credentials > Submit 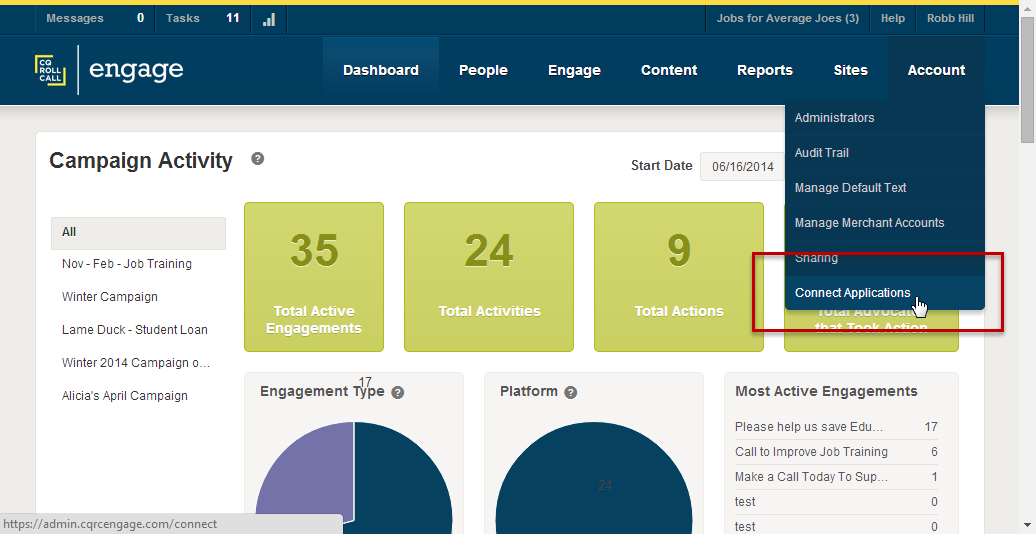
Install the Engage for Salesforce Base Application for Contacts and Elected Officials
1. You may be asked to log into the destination Salesforce Organization during this process. Navigate to the following URL or search in the AppExchange for ‘Engage for Salesforce’ to find the app:
https://appexchange.salesforce.com/listingDetail?listingId=a0N3000000B519uEAB
2. The Engage for Salesforce AppExchange listing will load. Click ‘Get it Now’
3. If you want to install the app first in your sandbox, you will need to select ‘Install in Sandbox’ or replace the initial portion of the URL with https://test.salesforce.com./ which will load the sandbox installation page. You will be prompted to select Production or Sandbox. If you are not, append the URL, as needed.
4. Read and agree to the terms and conditions. Select the checkbox and click ‘Confirm and Install’.
5. The installer may ask you to permit data to be shared with a third-party website. These are the web-based services to which Salesforce connects to access Engage data. Select ‘Approve’ and click ‘Continue’.
6. Your version of Salesforce may require approval of the API Connection. Select ‘Yes’ and click ‘Continue’.
Once the installation is complete, you will be redirected to view all installed packages. Validate ‘Engage for Salesforce’ is listed.
Install the Engage for Salesforce Extension Application for Campaigns
The Base Package installed above syncs Contacts, Advocates, and Elected Officials. The optional Extension Package syncs Engage Activities.
The optional Extension package is dependent on your Salesforce Org’s use of Campaigns. If you do not have Campaigns, there is no need to install the Extension package. Please continue to configure your Base package.
If your Salesforce org does have Campaigns, it is necessary to also install the Engage for Salesforce Extension package. In order for Engage Activities (e.g. Write a Letter, Make a Call, etc.) to sync to Salesforce, both Base and Extension packages must be installed.
To install the Extension package, click the following link after the Base Package has been installed.
https://login.salesforce.com/packaging/installPackage.apexp?p0=04tj0000001ys14
If not prompted and you want to install to the Sandbox, it is necessary to append the URL to be
https://test.salesforce.com/packaging/installPackage.apexp?p0=04tj0000000D6uj
Configure Your Credentials: Base Package
1. Select Engage for Salesforce from your installed packages.
2. The Engage for Salesforce splash-page will load.
3. Navigate to the Advanced tab and select Restart Truncation Job.
3. Click the ‘Configuration’ tab. This will configure credentials for the base package, to allow syncing of contact and advocate records and elected officials.
4. Enter the Username, Password, and Endpoint associated with your Connect Application. Be sure to save your changes.
The Username and Password should be provided for you by your Engage Account Executive. These are not the same credentials as your Engage Admin access username and password.
If you do not remember these credentials, login to Engage Admin>Account>Connect Application and they will be stored there. If you’re still having trouble, contact your Account Executive.
The Endpoint URL is (the default for all Engage customers): https://connect.cqrcengage.com/api/v1
5. If Person Accounts is enabled in your organization, and you would like to sync your Engage advocates to your Salesforce Person Account records, select the Person Account Support checkbox. For more information on Engage for Salesforce Person Account support, click here.
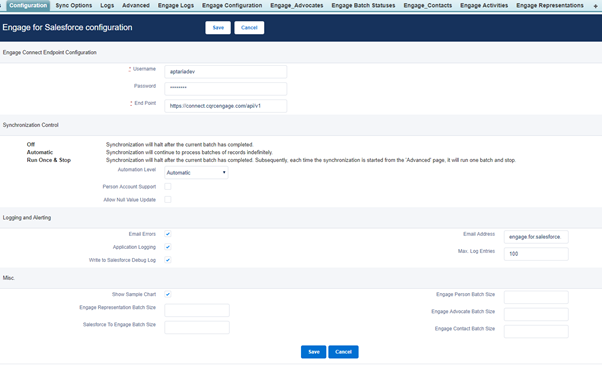
You can also use this configuration area to set the Engage Person Batch Size. The minimum batch size is 1.
Important Note: Updates made to Salesforce contacts or Engage advocates prior to installing the application will not be synced. Once the application is installed and configured, you may want to run an update on your Salesforce contacts or Engage advocates so that the Last Update timestamp on the record triggers a sync.
Configure Your Credentials: Extension Package
1. To access the Campaign Configuration of the Extension package, click the + sign located on the menu of the Engage for Salesforce app.
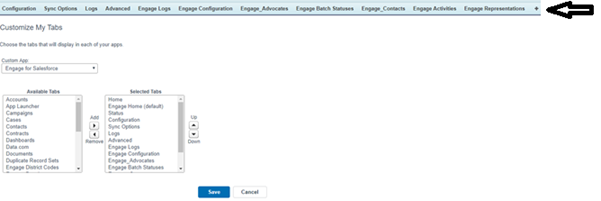
2. Click Customize my Tabs
3. Add Campaign Configuration to Selected Tabs and Save.
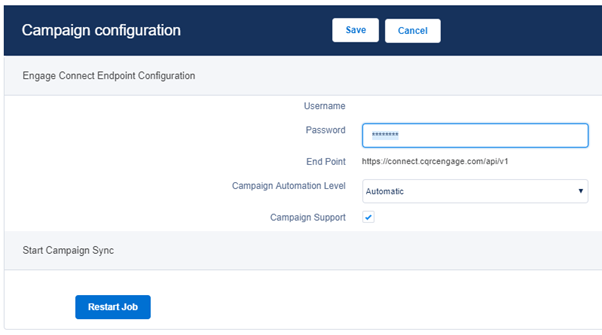
4. Navigate to the Campaign Configuration tab and enter the Password associated with your Connect Application. Your Username and Endpoint will already be pre-filled. Be sure to save your changes.
Important Note: Activity data created in Engage prior to installing the application will not sync to Salesforce. Only activity created after the installation will sync to your Salesforce org.
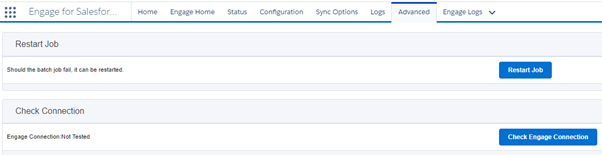
1. To test the connection between your Salesforce org and your Engage site, Click the ‘Advanced’ tab and select Check Engage Connection.
2. The ‘Engage Connection’ status should change from ‘Not Tested’ to ‘OK.’
If the status changes to ‘Failed’, verify the username, password, and endpoint. Then repeat the ‘Check Engage Credentials’ process again.
Configure Your Sync Preferences
Once Engage for Salesforce successfully connects to the Engage Connect API, the synchronization preferences need to be configured.
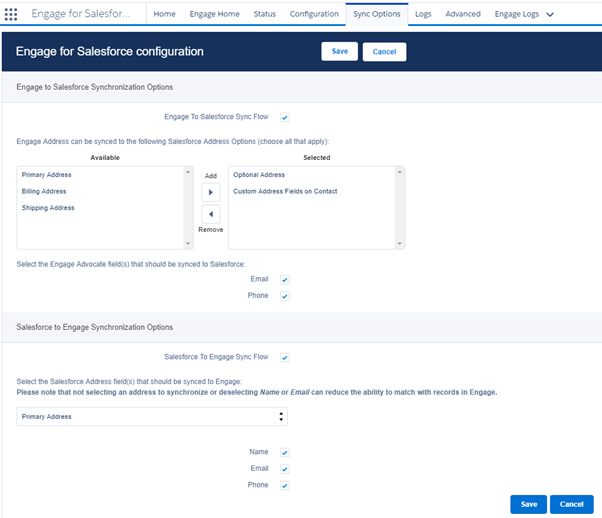
1. Click the ‘Sync Options’ tab. This page configures how the data between the two systems will flow. The application allows for both uni-directional and bi-directional synchronization.
Use the Engage to Salesforce Sync Flow and the Salesforce to Engage Sync Flow check boxes to activate (or deactivate) synchronization in that particular direction.
The name and email are the matching criteria between Engage and Salesforce. For most configurations we recommend choosing Primary Address, and Custom Address fields, Name, Email, and Phone for sync.
For more on field mapping see Engage to Salesforce and Salesforce to Engage sync options.
2. Click Save
Note: If you do not want all of you records to continuously sync, come back to the page at any time to turn off the sync and stop the data flow.
To create a quick test, create and advocate record in Engage or in Salesforce, and check to see if the record was created and looks accurate. For additional testing detail, there is more information in the Testing the Sync section.
Important Note: Nonprofit Starter Pack (NPSP) and NGO Connect may require configuration of batch sizes. Click Here for additional information.
Other Sync Configuration Considerations
The Engage app by default will not sync blank values on to Contact record from Engage Advocate. For example, if the Address field is made blank on an Engage Advocate record which is already synced to a Salesforce Contact, this update will not be carried over to Salesforce by the connector. If you do want the blank update to be synced, check the “Allow Null Value Update” field on the configuration page shown below:

Update Your Salesforce Contact Page Layout
To include the elected official and activity data on a contact page, you need to customize the Page Layouts to show Elected Officials and Activities Objects and related fields.
To add the Elected Officials object and related fields, go to Setup -> Customize – > Contacts -> Page Layouts.
-
- Click the Edit link next to the Contact Layout that you want to edit
- The Layout Editor will be launched
- Select “Related Lists”
- Drag and Drop the “Elected Officials” related list into your page layout
- Click on the “wrench” symbol in the Elected Officials related list to add/edit the following fields into “Selected Fields”
- Click Ok and then click Save in the Layout Editor

Elected Official Suggested fields:
-
- Engage Person Name
- Current Position Label
- Current Position District Code and/or Current Position State
- Total Number of Advocates
All Elected Official field options:
-
- Engage Person: Engage Person Name
- Engage Person: First Name
- Engage Person: Last Name
- Engage Person: Current Position District Code
- Engage Person: Current Position Label
- Engage Person: Current Position State
- Engage Person: Current Chamber
- Engage Person: Government Level
- Engage Person: Party
To add the Engage Activities object and related fields, go to Go to Setup -> Customize – > Contacts -> Page Layouts.
-
- Click the Edit link next the Contact Layout
- The Layout Editor will be launched
- Select “Related Lists”
- Drag and Drop the “Engage Activities” related list into your page layout
- Click on the “wrench” symbol in the Engage Activities related list and add/edit the following fields into “Selected Fields”
- Click Ok and then click Save in the Layout Editor
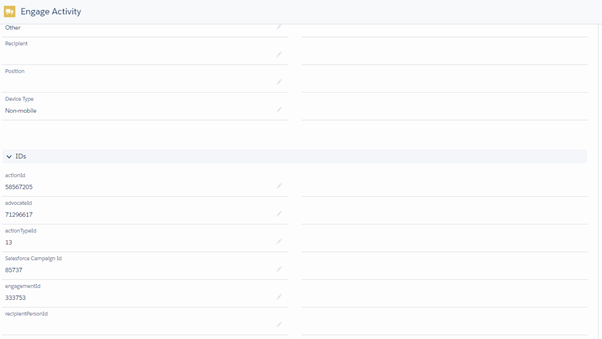
Engage Activities Suggested Fields:
-
- Action Date
- Action Type
- Recipient
- Salesforce Campaign
Click Ok and then click “Save” in the Layout Editor (if you are prompted with additional confirmation click “Yes”.)
Update Your Salesforce Campaign Page Layout
If you have installed the Extension package to sync Engage engagements to Salesforce Campaigns, you can take advantage of the campaign roll up summaries from the Engage Activities related list.
- To add the roll up summary related fields, go to Go to Setup -> Customize – > Campaigns -> Page Layouts.
- Edit the appropriate Campaign Layout
- Select the roll up summary fields you wish to add, including:
- Number of Call Count
- Number of Donation Count
- Number of Letter Count
- Number of Petition Count
- Number of Story Count
- Number of Tweet Count
- Total Activity Count
Once the final customization is complete, there are a number of tests you can run to validate the sync.
Set the Automation Level (on the Configuration tab) to ‘Run Once and Stop’. This causes the system to synchronize once and then turn itself off, providing an opportunity to add or edit records in each system on an ad-hoc basis.
Click ‘Save’.
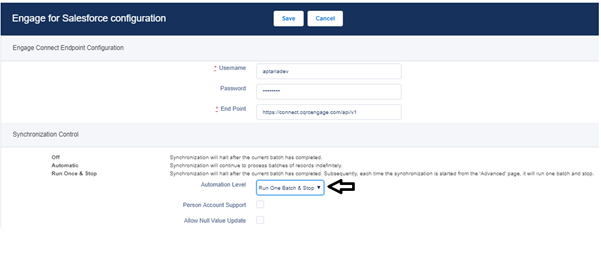
Note: the sync should be set to ‘Run One Batch & Stop’ BEFORE any updates to contact records Salesforce or Engage are made.
Edit or create a record in Salesforce and/or Engage (depending on the sync direction configuration settings you chose earlier).
For example, For the Engage to Salesforce sync, create a new Advocate record in Engage & vice versa.
Status Page
The status of the most recent batches, along with a quick view of activity throughout the current day.
Data Validation Best Practices for a Successful Sync
Salesforce customizations and configurations may interfere with the Engage data sync to the Salesforce Contact and Campaign objects. Validation rules, triggers and record types on these objects can cause data sync failures. The fields involved in these syncs are detailed in the tables below for reference.
- Validation Rules on Contact and/or Campaign objects – The sync may fail because of custom validation rules setup in your Salesforce org that conflict with the data synced by the app. It is recommended to bypass the records created by the Engage For Salesforce app and then populate default values via Workflow/Trigger.
- Triggers on Contact and/or Campaign objects – If the triggers that exists on these objects (may be from another package or developed and deployed) are written in such a way that the exceptions thrown in the triggers are handled within those triggers itself, the Engage for Salesforce app will not get a trace of failure in the custom Logs implemented in the app. In such conflicting situations, it is recommended to test the triggers by turning them “off”, and verifying if the sync works.
- Record Types on Contact and/or Campaign objects – If record types are implemented on these two objects in your Salesforce org, please make sure a default record type is set at the profile level for the user who installs the package.
- Manual Data Upload – During any manual or external upload of data into your Salesforce Org, there is no trigger, workflow, update, or validation running. Salesforce for Engage is collection of apex batches and therefore, not triggered by a manual upload of data. Example: If you upload data into your Salesforce Org’s ‘Contact’ object, it will not trigger the creation of Engage Advocate records. These bulk uploads should be manually uploaded to Engage as outlined here.
Contact Fields Synced from Engage:
| Field Label | Field Name | Field Type |
| First Name | FirstName | Text(40) |
| Last Name | LastName | Text(80) |
| Salutation | Salutation | Text(40) |
| Email(80) | ||
| Home Phone | HomePhone | Phone(40) |
| Mailing Street | MailingStreet | Text(255) |
| Mailing City | MailingCity | Text(40) |
| Mailing State/Province | MailingState | Text(80) |
| Mailing Zip/Postal Code | MailingPostalCode | Text(20) |
| Mailing Country | MailingCountry | Text(80) |
| Other Street | OtherStreet | Text(255) |
| Other City | OtherCity | Text(40) |
| Other State/Province | OtherState | Text(80) |
| Other Zip/Postal Code | OtherPostalCode | Text(20) |
| Other Country | OtherCountry | Text(80) |
| Engage_Ext_Id | e4sf__Engage_Ext_Id__c | Text(20) |
| Engage Address City | e4sf__Engage_Address_City__c | Text(40) |
| Engage Address Country | e4sf__Engage_Address_Country__c | Text(80) |
| Engage Address PostalCode | e4sf__Engage_Address_PostalCode__c | Text(20) |
| Engage Address State | e4sf__Engage_Address_State__c | Text(80) |
| Engage Address Street | e4sf__Engage_Address_Street__c | Text(255) |
| Engage Batch Id | e4sf__Engage_Batch_Id__c | Text(255) |
| Engage Date Last Sync | e4sf__Engage_Date_Last_Sync__c | Date/Time |
| Engage Is Advocate | e4sf__Engage_Is_Advocate__c | |
| Engage Never Sync To Engage | e4sf__Engage_Never_Sync_To_Engage__c | Checkbox |
| Engage Opt Out | e4sf__Engage_Opt_Out__c | Checkbox |
| Engage Phone | e4sf__Engage_Phone__c | Phone(40) |
| Federal District – Lower Chamber | e4sf__Engage_Federal_District_Lower_Chamber__c | Text(10) |
| Federal District – Upper Chamber | e4sf__Engage_Federal_District_Upper_Chamber__c | Text(10) |
| State District – Lower Chamber | e4sf__Engage_State_District_Lower_Chamber__c | Text(10) |
| State District – Upper Chamber | e4sf__Engage_State_District_Upper_Chamber__c | Text(10) |
Campaign Fields Synced from Engage:
| Field Label | Field Name | Field Type |
| Campaign Name | Name | Text(80) |
| Start Date | StartDate | Date |
| End Date | EndDate | Date |
| Active | IsActive | Checkbox |
| Status | Status | Picklist CAMPAIGN_STATUS_PLANNED,CAMPAIGN_STATUS_IN_PROGRESS,CAMPAIGN_STATUS_ABORTED,CAMPAIGN_STATUS_COMPLETED. |
| Engage External Id | e4sfExt__Engage_External_Id__c | Text(20) (External ID) (Unique Case Insensitive) |
If you have a robust number of Engage records or Salesforce records you will be syncing from one solution to the other, we recommend validating the data is clean, before syncing. If you are confident in the integrity of the data, this is not a required step. It is possible to install the application first, and then auto-sync the data. We recommend following the optional guidelines only if you are concerned about the integrity of the data.
There is no single process that covers all clients’ needs with regards to the initial mapping, de-duplication, and export/import processes. How to deal with records in Salesforce and not in Engage, in Engage and not in Salesforce and/or records in both systems is a client business process decision. Furthermore how to identify a record in one system as being the ‘same’ in the other system would vary from client to client.
Some clients 3rd party tools like the following for data management.
-
- DemandTools by CRMFusion: http://www.crmfusion.com/demandtools/
- Dupe Eliminator by Salesforce Labs: https://appexchange.salesforce.com/listingDetail?listingId=a0N3000000178g7EAA
CQ Roll Call does not specifically endorse any of these products. Please note that many of CQ Roll Call’s clients use these tools for the types of tasks listed above. In addition CQ Roll Call cannot support data management efforts on behalf of the client.
Optional export/import process before integration
For clients who wish to export data from Salesforce into Engage as the first step in the integration. Whether this is to add data to Engage from Salesforce or establish an external ID link between Engage and Salesforce, the same process applies. This is not required. This process can be completed after integration, which is recommended unless you have concerns about data integrity.
Existing Advocates are matched based on the following criteria:
-
- External ID
- Email address
- The combination of First Name, Last Name, Zip Code
To upload records from Salesforce to Engage, you must first export a file from Salesforce, formatted as a CSV (comma separated value) document and verify it contains the necessary Advocate fields. You will be prompted to upload this file when you select the Upload Advocate option in Engage.
Your file must have a .csv extension. If you are using a tool like Excel, make sure to save your document as type .csv before trying to upload it into Engage.
They can be in any order in the CSV file, but columns headers used for file upload must exactly match the names as listed below (including all spaces, case sensitivity, etc.). If the format does not match, the upload will fail.
Salesforce to Engage Field Mappings
| Salesforce Field Name | Engage Field Name | Notes |
| emailAddress | required | |
| Id | externalId | required |
| Salutation | prefix | |
| FirstName | firstName | |
| LastName | lastName | |
| MailingStreet | address1 | If the Salesforce value of MailingStreet contains multiple lines, line one should be mapped to address1 and line two to address2. |
| MailingStreet | address2 | |
| MailingCity | city | |
| MailingState | state | USPS state |
| MailingPostalCode | zip |
|
| MailingCountry | country |
|
| Phone | phone | |
| globalEmailOptout | Valid values: True, False | |
| active | If Advocate record is active; it is eligible to receive communications sent from Engage this value should be set to 1, otherwise 0. The default value is 1. |
Generate the Export from Salesforce using Salesforce Dataloader
1. Select Export
2. Login using your Salesforce Username, Password and security token
3. Select the Contact as the Data Object
4. Select the following query fields from the Contact object: Select Id, Salutation, FirstName, LastName, MailingStreet, MailingCity, MailingState, MailingPostalCode, MailingCountry, HomePhone
5. Open the CVS file and rename the columns according to the mapping table above.
Upload the Salesforce CSV file
Once you have created your CSV file, you are ready to upload your file:
1. In Engage, go to Advocates: Upload Advocates (on right column)
2. A Batch Upload Advocates in CSV pop-up window will display
3. Email Notification: Enter the email address of the person to whom the status confirmation email should be sent once the upload has completed processing.
4. Upload CSV File: Select an existing CSV file to upload from your computer. Click “Submit”.
After uploading your file, a status confirmation email will be sent. If the email indicates that the upload was processed successfully, then all the Advocates were saved to the database.
Note: it may take a few minutes before confirmation is received, depending on the size of your upload and other upload activity on the Engage servers.
Principle of Operations/Troubleshooting
The matching strategy for Salesforce Contact and Engage Advocate records is illustrated below (in the order in which they appear).
- Is there a primary key from the destination system on the source record?
- Is the Email address present?
- Are the First, Last AND ZIP Code present?
Contacts synchronized between the systems will be matched on the following criteria in the order shown:
- Upon the creation or modification of a contact record in Salesforce, the same is created or modified in Engage.
- Upon the creation or modification of a contact record in Engage, the same will be created or modified in Salesforce.
- Upon the creation of an activity record in Engage, the same will be created in Salesforce. Upon the creation of an Engagement, Campaign, or Issue in Engage, a Campaign will be created in Salesforce (if that option is selected and configured).
- Record matching criteria and address location are configured by the user.
- Other configuration parameters to control the synchronization, logging, log maintenance, and display functionality are provided.
Following is the mapping of entities between Engage and Salesforce:
| Engage | Salesforce |
| Advocate | Contact / Person Account |
| Activity | Engage Activity |
| Engagement | Campaign |
| Elected Officials | Elected Officials / Engage Persons |
Salesforce campaign and Engage engagements
When an Engagement is created in Engage it will be automatically be created in Salesforce as a Campaign. This is a one-way synchronization from Engage to Salesforce. This Campaign may then be left as is, meaning a top-level Campaign, or assigned to a parent Campaign. Should the Engagement be edited, those changes will be reflected in Salesforce. However, there is no automated deletion of an Engagement in Salesforce.
Engage to Salesforce Address Sync Options
The Engage Primary Address can be synced to all three of these Salesforce addresses, or a subset, simultaneously:
- Primary/Mailing Address
- Optional/Other Address
- Custom Address
Salesforce Custom Address Fields defined:
| Field Label | Field Name |
| Engage Address Street | e4sf__Engage_Address_Street__c |
| Engage Address City | e4sf__Engage_Address_City__c |
| Engage Address State | e4sf__Engage_Address_State__c |
| Engage Address PostalCode | e4sf__Engage_Address_PostalCode__c |
| Engage Address Country | e4sf__Engage_Address_Country__c |
Name, Email, Phone: If selected, the corresponding fields from Engage will be synchronized to Salesforce.
Salesforce to Engage Address Sync Options
Only one of the following Salesforce addresses can be selected to sync to the Engage Primary Address:
- Primary/Mailing Address
- Optional/Other Address
- Custom Address
Name, Email, Phone: If selected the corresponding field from Salesforce will be synchronized to Engage.
Optional App Fields on the Salesforce Record
Engage Never Sync to Engage
You may choose to selectively exclude individual Salesforce Contact records from syncing to Engage by selecting the Engage Never Sync to Engage custom field on the contact record. If this field’s value is checked (true), the Contact record will be excluded from all synchronizations to Engage.
Object: Contact
Field Label: Engage Never Sync to Engage
Field Name: e4sf__Engage_Never_Sync_To_Engage__c
Field Type: Checkbox
Global Opt-Out
In Engage, the global opt-out flag may be set on an Advocate record. This value is synchronized with the Engage_Opt_Out__c field on the Contact object. The value will be synchronized to Engage if it is changed.
Object: Contact
Field Label: Engage_Opt_Out
Field Name: e4sf__Engage_Opt_Out__c
Field Type: Checkbox
While Engage for Salesforce shares this information to Salesforce by an Engage for Salesforce application-specific field on the Contact record, it will need to be integrated into client systems e.g.
-
- A custom trigger may be required to update another object based on the change in value of the Global Opt-out field.
- Reports can be created to use this field as part of their query.
Engage Is Advocate
The Engage Is Advocate field identifies if the Salesforce contact originated from Engage.
Object: Contact
Field Label: Engage Is Advocate
Field Name: e4sf__Engage_Is_Advocate__c
Field Type: Checkbox
Default Value: Unchecked
Engage Date Last Sync
The Engage Date Last Sync field identifies the date/time the Salesforce contact was last updated from Salesforce.
Object: Contact
Field Label: Engage Date Last Sync
Field Name: e4sf__Engage_Date_Last_Sync__c
Field Type: Datetime
Default Value: Null
Successes and errors can be viewed on the Logs page under the Logs tab.
Note: The sync runs every 5 minutes; Advocates and Contacts may not sync right away.
Possible Error Messages Defined:
Access to entity ‘Campaign’ denied: Entity is not api accessible: Salesforce user who installed/configured the app in that org doesn’t have access to Campaigns. In order to access Campaigns in Salesforce, the logged in user should have the “Marketing User” checkbox set to true in the User record.
One Advocates were failed in Salesforce from Engage: An Engage advocate failed to sync from Engage to Salesforce. To view the details of the failed advocate(s), select the Advanced tab. Select the Advocate Queue link at the bottom of the page.
If you wish to delete the Engage Logs:
- Launch Developer Console by clicking Your Name -> Developer Console
- In the Developer Console menu, click Debug – > Open Execute Anonymous Window OR click Ctrl + E (shortcut) to open the execute anonymous window.
- Then copy and paste the following code in the execute anonymous windowdelete [Select id from e4sf__Engage_Log__c order by createddate asc limit 10000 ];
- Click the “Execute” button
- For existing customers – If you receive a “First activity exception message – Required fields are missing: e4sf__salesforceCampaignId__c”. Please remove this field from Engage_Activity object.
Please note that only maximum of 10,000 records can be deleted in one execution. If you want to delete more, execute the code again via the execute anonymous window.
Restarting the Base and Extension Batch Jobs
If the Base or Extension batch job stops running, you can manually restart each job.
To restart the Base batch job, navigate the Advanced tab and select Restart Job.
To restart the Extension batch job, navigate to the Campaign Configuration tab and select Restart Job.
Nonprofit Starter Pack (NPSP) and NGO Connect Batch Size Adjustment
If your Salesforce Org uses the Nonprofit Starter Pack (NPSP) or NGO Connect, there is a possibility that the sync could fail because of the number of Contact records synced at a time. To avoid the issue, the batch size parameter of the sync can be configured via the Configuration page as shown below:

Engage Advocate Batch Size
The Engage Advocate Batch Size controls the size of the batch job that creates Salesforce Contacts from Engage Advocates. The default value is 200 (i.e., even when this field is blank, 200 is used internally).
For a typical NPSP client, 200 (the default value) is the recommend batch size for Contact creation. If you still run into governor limits issue for any other another reason, you can use this field to set a value lower than 200.
For a typical NGO Connect client, 15 is the recommend batch size for Contact creation. NGO Connect clients should enter the value of 15 in the “Engage Advocate Batch Size” field and click Save button.
Other Batch Size fields
All the other batch size fields available in the configuration page serve for adjusting the batch size of other entities that are synced (including the Salesforce to Engage sync direction). The default value of 200 is appropriate for these fields. On rare occasion there is a need to increase/decrease the value from 200 on these fields, please contact your Engage Account Executive.
Troubleshooting Tips:
- Avoid any manual changes once Engage for Salesforce active.
- Sync process is fully automated, it doesn’t required any manual intervention once active.
- Do not use a duplicate external id (SFID), duplicate email addresses, and do not clone records in Saleforce.
- Once you have installed Engage for Salesforce please check the connection of Connect API on the Configuration tab.